This section assumes that you have an adequate understanding of the NIS+ security system in general, and in particular of the role that access rights play in that system.
This section provides the following general information about access rights:
If you need to review authorization classes or access rights in general, see NIS+ Namespace and Structure
Authorization classes are concatenated. In other words, the higher class usually belongs to the lower class and automatically gets the rights assigned to the lower class. It works like this:
The basic principle that governs this is that access rights override the absence of access rights. In other words, a higher class can have more rights than a lower class, but not fewer rights. (The one exception to this rule is that if the owner is not a member of the group, it is possible to give rights to the group class that the owner does not have.)
When you create an NIS+ object, NIS+ assigns that object a default set of access rights for the owner and group classes. By default, the owner is the NIS+ principal who creates the object. The default group is the group named in the NIS_GROUP environment variable. See Default Access Rights for details.
NIS+ provides two different ways to change the default rights that are automatically assigned to an NIS+ object when it is created.
If the value of the NIS_DEFAULTS environment variable is changed, objects created after the change are assigned the new values. However, previously created objects are not affected.
When an NIS+ object is created, it comes into existence with a default set of access rights (from either the NIS_DEFAULTS environment variable or as specified with the -D option). These default rights can be changed with the
NIS+ tables allow you to specify access rights on the table three ways: you can specify access rights to the table as a whole, to each table column individually, and to each entry (row) by itself. (A field is a single cell in the matrix or, in other words, the intersection between a column and an entry (row). All data values are entered in fields.)
| (Column) | |||||
| (Entry) | FIELD | ||||
These column- and entry level access rights allow you to specify additional access to individual rows and columns that override table level restrictions, but column and entry level rights cannot be more restrictive than the table as a whole:
On the other hand, if the table level grants table-wide read rights to the owner and group classes, you cannot use column-level rights to prevent the group class from having read rights to that column.
Keep in mind that a column's group does not have to be the same as the table's group or an entry's group. They can all have different groups.
Keep in mind that an entry's group does not have to be the same as the table's group or a column's group. They can all have different groups. This means that you can permit members of a particular group to work with one set of entries while preventing them from affecting entries belonging to other groups.
Column- or entry-level access rights can provide additional access in two ways: by extending the rights to additional principals or by providing additional rights to the same principals. Of course, both ways can be combined. Following are some examples.
Assume a table object granted read rights to the table's owner:
| Nobody | Owner | Group | World | |
|---|---|---|---|---|
| Table Access Rights: | ---- | r--- | ---- | ---- |
This means that the table's owner could read the contents of the entire table but no one else could read anything. You could then specify that the following table grant read rights to the group class:
| Nobody | Owner | Group | World | |
|---|---|---|---|---|
| Table Access Rights: | ---- | r--- | ---- | ---- |
| Entry-2 Access Rights: | ---- | ---- | r--- | ---- |
Although only the owner could read all the contents of the table, any member of the table's group could read the contents of that particular entry. Now, assume that a particular column granted read rights to the world class:
| Nobody | Owner | Group | World | |
|---|---|---|---|---|
| Table Access Rights: | ---- | r--- | ---- | ---- |
| Entry-2 Access Rights: | ---- | ---- | r--- | ---- |
| Column-1 Access Rights: | ---- |
---- | ---- | r--- |
Members of the world class could now read that column for all entries in the table (see following example). Members of the group class could read everything in Column-1 (because members of the group class are also members of the world class) and also all columns of Entry-2. Neither the world nor the group classes could read any cells marked in the following example as *NP* (for Not Permitted).
| Col 1 | Col 2 | Col 3 | |
|---|---|---|---|
| Entry-1 | contents | *NP* | *NP* |
| Entry-2 | contents | contents | contents |
| Entry-3 | contents | *NP* | *NP* |
| Entry-4 | contents | *NP* | *NP* |
| Entry-5 | contents | *NP* | *NP* |
This section describes how the four different access rights (read, create, modify, and destroy) work at the four different access levels (directory, table, column, and entry).
The objects that these various rights and levels act on are summarized in the following table:
| Directory | Table | Column | Entry | |
|---|---|---|---|---|
| Read | List directory contents | View table contents | View column contents | View entry (row) contents |
| Create | Create new directory or table objects | Add new entries (rows) | Enter new data values in a column | Enter new data values in an entry (row) |
| Modify | Move objects and change object names | Change data values anywhere in table | Change data values in a column | Change data values in an entry (row) |
| Destroy | Delete directory objects such as tables | Delete entries (rows) | Delete data values in a column | Delete data values in an entry (row) |
An object's access rights are specified and stored as part of the object's definition. This information is not stored in an NIS+ table.
The access rights can be viewed by using the niscat command.
niscat -o objectname
Where objectname is the name of the object whose access rights you want to view.
This command returns the following information about an NIS+ object:
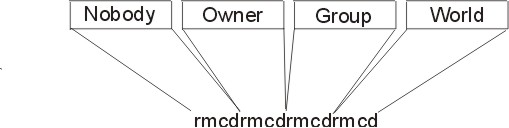
Access rights for the four authorization classes are displayed as a list of 16 characters, like this:
r---rmcdr---r---
Each character represents a type of access right:
The first four characters represent the access rights granted to nobody, the next four to the owner, the next four to the group, and the last four to the world.
Note: Unlike UNIX file systems, the first set of rights is for nobody, not for the owner.
When you create an object, NIS+ assigns the object a default owner and group, and a default set of access rights for all four classes. The default owner is the NIS+ principal who creates the object. The default group is the group named in the NIS_GROUP environment variable. Initially, the default access rights are:
| Nobody | Owner | Group | World |
|---|---|---|---|
| - | read | read | read |
| - | modify | - | - |
| - | create | - | - |
| - | destroy | - | - |
If you have the NIS_DEFAULTS environment variable set, the values specified in NIS_DEFAULTS will determine the defaults that are applied to new objects. When you create an object from the command line, you can use the -D flag to specify values other than the default values.
This section discusses how a server grants access to tables objects, entries, and columns during each type of operation: read, modify, destroy, and create.
Note: At security level 0, a server enforces no NIS+ access rights and all clients are granted full access rights to the table object. Security level 0 is only for administrator setup and testing purposes. Do not use level 0 in any environment where ordinary users are performing their normal work.
The four factors that a server must consider when deciding whether to grant access are:
After authenticating the principal making the request by making sure the principal has a valid DES credential, an NIS+ server determines the type of operation and the object of the request.
The following paragraphs describe how to specify access rights, as well as owner, group owner, and object, when using any of the commands described in this section. (This section assumes an NIS+ envrionment running at the default security level 2.)
Access rights, whether specified in an environment variable or a command, are identified with three types of arguments: class, operator, and right.
Class refers to the type of NIS+ principal (authorization class) to which the rights will apply.
| Class | Description |
|---|---|
| n | Nobody: all unauthenticated requests |
| o | The owner of the object or table entry |
| g | The group owner of the object or table entry |
| w | World: all authenticated principals |
| a | All: shorthand for owner, group, and world (this is the default) |
The operator indicates the kind of operation that will be performed with the rights
| Operator | Description |
|---|---|
| + | Adds the access rights specified by right |
| - | Revokes the access rights specified by right |
| = | Explicitly changes the access rights specified by right; in other words, revokes all existing rights and replaces them with the new access rights. |
The rights are the access rights themselves. The accepted values for each are listed below.
| Right | Description |
|---|---|
| r | Reads the object definition or table entry |
| m | Modifies the object definition or table entry |
| c | Creates a table entry or column |
| d | Destroys a table entry or column |
You can combine operations on a single command line by separating each operation from the next with a comma (,).
| Operations | Syntax |
|---|---|
| Add read access rights to the owner class | o+r |
| Change owner. group, and world classes' access rights to modify only from whatever they were before. | a=m |
| Add read and modify rights to the world and nobody classes | wn+m |
| Remove all four rights from the group, world, and nobody classes. | gwn-rmcd |
| Add create and destroy rights to the owner class and add read and modify rights to the world and nobody classes | o+cd,wn+rm |
For owner:
principalname
For group:
groupname.domainname
Objects and table entries use different syntaxes.
For objects:
objectname
For table entries:
[columnname=value],tablename
Note: In this case, the brackets are part of the syntax.
Indexed names can specify more than one column-value pair. If so, the operation applies only to the entries that match all the column-value pairs. The more column-value pairs you provide, the more stringent the search.
For example:
| Type | Example |
|---|---|
| Object | hosts.org_dir.sales.wiz.com. |
| Table entry | '[uid=33555],passwd.org_dir.Eng.wiz.com.' |
| Two-value table entry | '[name=sales,gid=2],group.org_dir.wiz.com.' |
Columns use a special version of indexed names. Because you can only work on columns with the nistbladm command, see its command description for more information.
The nisdefaults command displays the seven default values currently active in the namespace. These default values are either:
Any object that you create on this machine will automatically acquire these default values unless you override them with the -D option of the command you are using to create the object.
| Default | Option | From | Description |
|---|---|---|---|
| Domain | -d | /bin/domainname | Displays the home domain of the workstation from which the command was entered. |
| Group | -g | NIS_GROUP environment variable | Displays the group that would be assigned to the next object created from this shell. |
| Host | -h | uname -n | Displays the workstation's host name. |
| Principal | -p | gethostbyname() | Displays the fully qualified user name or host name of the NIS+ principal who entered the nisdefaults command. |
| Access Rights | -r | NIS_DEFAULTS environment variable | Displays the access rights that will be assigned to the next object or entry created from this shell. Format:----rmcdr---r--- |
| Search path | -s | NIS_PATH environment variable | Displays the syntax of the search path, which indicate the domains that NIS+ will search through when looking for information. Displays the value of the NIS_PATH environment variable if it is set. |
| Time-to-live | -t | NIS_DEFAULTS environment variable | Displays the time-to-live that will be assigned to the next object created from this shell. The default is 12 hours. |
| All (terse) | -a | Displays all seven defaults in terse format. | |
| Verbose | -v | Display specified values in verbose mode. |
You can use these options to display all default values or any subset of them:
master% nisdefaults
Principal Name : topadmin.wiz.com.
Domain Name    : wiz.com.
Host Name      : rootmaster.wiz.com.
Group Name     : salesboss
Access Rights  : ----rmcdr---r---
Time to live   : 12:00:00:00:00
Search Path    : wiz.com.
rootmaster% nisdefaults -rs
----rmcdr---r---
wiz.com.
This section describes how to perform tasks related to the nisdefaults command, the NIS_DEFAULTS environment variable, and the -D option. The NIS_DEFAULTS environment variable specifies the following default values:
The values that you set in the NIS_DEFAULTS environment variable are the default values applied to all NIS+ objects that you create using that shell (unless overridden by using the -D option with the command that creates the object).
You can specify the default values (owner, group, access rights, and time-to-live) specified with the NIS_DEFAULTS environment variable. Once you set the value of NIS_DEFAULTS, every object you create from that shell will acquire those defaults, unless you override them by using the -D option when you invoke a command.
You can check the setting of an environment variable by using the echo command, as shown below:
client% echo $NIS_DEFAULTS
owner=butler:group=gamblers:access=o+rmcd
You can also display a general list of the NIS+ defaults active in the namespace by using the nisdefaults command.
You can change the default access rights, owner, and group, by changing the value of the NIS_DEFAULTS environment variable. Use the environment command that is appropriate for your shell with the following arguments:
You can combine two or more arguments into one line, separated by colons:
owner=principal-name:group=group-name
| Tasks | Examples |
|---|---|
This command grants owner read access as the default access right. |
client% export NIS_DEFAULTS="access=o+r" |
| This command sets the default owner to be the user abe whose home domain is Wiz.com. | client% export NIS_DEFAULTS="owner=abe.wiz.com." |
| This command combines the first two examples on one code line. | client% export NIS_DEFAULTS="access=o+r:owner=abe.wiz.com." |
All objects and entries created from the shell in which you changed the defaults will have the new values you specified. You cannot specify default settings for a table column or entry; the columns and entries simply inherit the defaults of the table.
You can reset the NIS_DEFAULTS variable to its original values, by typing the name of the variable without arguments, using the following format:
client$ NIS_DEFAULTS=; export NIS_DEFAULTS
You can specify different (that is, nondefault) access rights, owner, and group, any time that you create an NIS+ object or table entry with any of the following NIS+ commands:
To specify security values other than the default values, insert the -D option into the syntax of those commands, as described in Specifying Access Rights in Commands.
As when setting defaults, you can combine two or more arguments into one line. Remember that column and entry's owner and group are always the same as the table, so you cannot override them.
For example, to use the nismkdir command to create a sales.wiz.com directory and override the default access right by granting the owner only read rights you would type:
client% nismkdir -D access=o+r sales.wiz.com
The nischmod command operates on the access rights of an NIS+ object or table entry. It does not operate on the access rights of a table column; for columns, use the nistbladm command with the -D option. For all nischmod operations, you must already have modify rights to the object or entry.
To add rights for an object, use:
nischmod class+right object-name
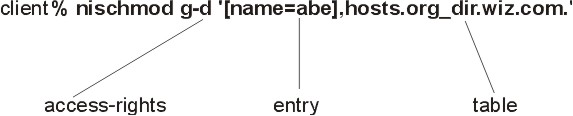
To add rights for a table entry, use:
nischmod class+right [column-name=value],table-name
For example, to add read and modify rights to the group of the sales.wiz.com. directory object you would type:
client% nischmod g+rm sales.wiz.com.
To add read and modify rights to group for the name=abe entry in the hosts.org_dir.wiz.com. table you would type:

To remove rights for an object, use:
nischmod class-right object-name
To remove rights for a table entry, use:
nischmod class-right [column-name=value],table-name
For example, to remove create and destroy rights from the group of the sales.wiz.com. directory object you would type:
client% nischmod g-cd sales.wiz.com.
For example to remove destroy rights from group for the name=abe entry in the hosts.org_dir.wiz.com. table, you would type:
The nistbladm command performs a variety of operations on NIS+ tables. However, two of its options, -c and -u, enable you to perform some security-related tasks:
When a table is created, its columns are assigned the same rights as the table object. These table level, rights are derived from the NIS_DEFAULTS environment variable, or are specified as part of the command that creates the table. You can also use the nistbladm -c option to specify initial column access rights when creating a table with nistbladm. To use this option you must have create rights to the directory in which you will be creating the table. To set column rights when creating a table use:
nistbladm -c type 'columname=[flags] [,access]... tablename'
Where:
To assign a column its own set of rights at table creation time, append access rights to each column's equal sign after the column type and a comma. Separate the columns with a space:
column=type,rights column=type,rights column=type,rights
The example below creates a table named depts in the Wiz.com directory, of type div, with three columns (Name, Site, and Manager), and adds modify rights for the group to the second and third columns:
rootmaster% nistbladm -c div Name=S Site=S,g+m Manager=S,g+m depts.wiz.com.
For more information about the nistbladm and the -c option, see Administering NIS+ Tables.
The nistbladm -u option allows you to add additional column access rights to an existing table column with the nistbladm command. To use this option you must have modify rights to the table column. To add additional column rights use:
nistbladm -u [column=access,...],tablename
Where:
Use one column=access pair for each column whose rights you want to update. To update multiple columns, separate them with commas and enclose the entire set with square brackets:
[column=access,column=access,column=access]
The full syntax of this option is described in the nistbladm command description.
The example below adds read and modify rights to the group for the name and addr columns in the hosts.org_dir.wiz.com. table.
client% nistbladm -u '[name=g+rm,addr=g+rm],hosts.org_dir.wiz.com.'
To remove access rights to a column in an NIS+ table, you use the -u option as described in the previous section except that you subtract rights with a minus sign (rather than adding them with a plus sign).
The example below removes group's read and modify rights to the hostname column in the hosts.org_dir.wiz.com. table.
client% nistbladm -u 'name=g-rm,hosts.org_dir.wiz.com.'
The nischown command changes the owner of one or more objects or entries. To use it, you must have modify rights to the object or entry. The nischown command cannot change the owner of a column, since a table's columns belong the table's owner. To change a column's owner, you must change the table's owner.
To change an object's owner, use the following syntax:
nischown new-owner object
Where:
Be sure to append the domain name to both the object name and new owner name.
The example below changes the owner of the hosts table in the Wiz.com. domain to the user named lincoln whose home domain is Wiz.com.:
client% nischown lincoln.wiz.com. hosts.org_dir.wiz.com.
The syntax for changing a table entry's owner uses an indexed entry to identify the entry, as shown below:
nischown new-owner [column=value,...],tablename
Where:
Be sure to append the domain name to both the new owner name and the table name.
The example below changes the owner of an entry in the Hosts table of the Wiz.com. domain to takeda whose home domain is Wiz.com. The entry is the one whose value in the name column is virginia.
client% nischown takeda.wiz.com. '[name=virginia],hosts.org_dir.wiz.com.'
The nischgrp command changes the group of one or more objects or table entries. To use it, you must have modify rights to the object or entry. The nischgrp command cannot change the group of a column, since the group assigned to a table's columns is the same as the group assigned to the table. To change a column's group owner, you must change the table's group owner.
To change an object's group, use the following syntax:
nischgrp group object
Where:
Be sure to append the domain name to both the object name and new group name.
The example below changes the group of the hosts table in the Wiz.com. domain to admins.wiz.com.:
client% nischgrp admins.wiz.com. hosts.org_dir.wiz.com.
The syntax for changing a table entry's group uses an indexed entry to identify the entry. In the following example, from column through tablename is the indexed entry.
nischgrp new-group [column=value,...],tablename
Where:
Be sure to append the domain name to both the new group name and the table name.
The example below changes the group of an entry in the Hosts table of the Wiz.com. domain to sales.wiz.com.. The entry is the one whose value in the host name column is virginia.
client% nischgrp sales.wiz.com. '[name=virginia],hosts.org_dir.wiz.com.'